DIY: Upcycle an End Table for Under $30

Domestic CEO shows you how to rehabilitate an old end table into a stylish piece of decor for under $30 – no previous DIY experience required!

Are you a dedicated recycler? I am and I encourage everyone to be as well.
But, did you know you can recycle more than paper, aluminum, and glass? Did you know that you can recycle furniture? I have a friend who is just wild about re-purposing and re-using whenever possible. An item that many of us wouldn’t give a second glance to, she can see potential and works a little magic to revive an old, tired piece of furniture. Recently, she did the most amazing redo on what most would consider a really ugly end table. I’m hoping this little tutorial will inspire you to do the same!
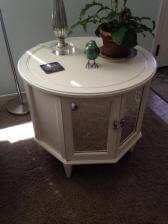
 Hello, the 70’s called and they want their end table back!
Wasn’t this piece of furniture in Grandma’s house? Sometimes it’s tough to see beyond the ugly finish and the geometric-shaped plastic inserts but if you look past all that, you’ll find a very sturdy, well-built piece of furniture that can last another 40+ years.
Here’s how to engineer your own amazing transformation:
What You’ll Need
- 1 ugly table that has an interesting shape or details
- Sandpaper: a medium grit and a fine grit
- Old cloth or rag
- Screwdriver and pliers
- Old sheets or a drop cloth
- Spray paint in the color of your choice (you can use all-in-one paint and primer)
- New knobs or pulls if you want to change them or spray paint to revive the existing hardware.
- Silicone glue
- Mirror
Before you begin, spread your old sheet or drop cloth out wherever you’re going to work on this project. Be sure to work in a well-ventilated area and be careful of overspray. Protect anything that you don’t want painted!
How to Make the Magic Happen
-
Using soapy water and a cloth or rag, wipe down the entire piece of furniture. Be sure to give cracks and crevices a good scrub. Use an old toothbrush if need be. You really want to remove any old, crusted-on gunk. Let it dry completely.
-
Sand the entire piece with the medium grit sandpaper. Wipe off the dust with a damp cloth.
-
Sand again using the fine grit sandpaper. Wipe down once more.
-
Remove the door and any hardware using a screwdriver. Be sure to remove all hardware from both the door and the table itself. Take a picture of how the hardware, especially hinges, are attached. This makes for much easier reattachment later. Put all screws and hardware in a small sandwich bag or lidded container so you don’t lose anything.
-
Remove any plastic inserts or panels. Usually there is a thin piece of plywood on the back holding the insert in place. Pry off this plywood with a screwdriver and pliers and remove any staples or small nails with the pliers. The plastic insert should pop right out.
-
Give the can of paint a good shake; then spray a light coating all over the piece of furniture and the door. It’s better to do a few light coats rather than one heavy coat. This eliminates the chance of paint drips. Use a consistent back and forth motion when spraying. Let each application dry for about 30 minutes to an hour. See also: How to Use Spray Paint
-
Lightly sand with the fine grit sandpaper between each paint application. Always wipe down with your damp cloth after sanding. The amount of paint applications can vary depending on the furniture and your paint. I would aim for 3-4 light coats of paint.
-
Will you re-use the existing hardware? If so, paint the old ugly, brass hardware a fun new color. If you’re looking for new hardware, your home improvement or hardware store has a good selection of basic knobs and pulls.
-
If you want to get fancy, you can have an old mirror cut to fit into any openings left by plastic inserts or panels. Check on-line to find a glass cutter near you and be sure to take the door with you so the mirror can be cut to the exact size. Use silicone glue to adhere the mirror panels to the doors. Be sure to do this from the back side of the door.
-
Once everything is painted and the mirrors are glued into place, reattach all hardware.
-
Stand back and enjoy your beautiful work!
Still unsure about tackling a DIY project like this? Let me share my friend’s total budget on rehabilitating this end table:
Old end table: $12 (half price day at Goodwill!)
2 cans spray paint: $6.43
Mirror cutting: $10.00
Total expenses: $28.43
Now are you inspired?
For more DIY tips and tricks, go to quickanddirtytips.com/house-home/diy